Page History: Design Creation Specifications
Compare Page Revisions
Page Revision: 2012/03/19 17:46
Design Creation Specifications
Before You Start
Our team at ezprints has worked hard to make the design creation process as easy as possible. However, there are many important details and specific instructions within this guide, which must be followed
precisely in order to ensure that your designs import properly and function as intended. It is important that you read through this document carefully and ensure that you understand the design creation process. There are links throughout this document to help you navigate through the manual.
Even if this is your first time creating designs, with the help of this guide, you should be able to overcome any obstacles that may come your way. In the past partners were required to submit two designs for review so we could verify they were properly created. This is no longer necessary with the suite of tools at your disposal. Once you have finished creating your first design, with the aid of this guide, just follow the instructions laid out in the
Design Center User Guide to upload and review your design. If you don't see any errors and everything looks good to you, feel free to continue designing and uploading.
All files should be created in Adobe Photoshop 7.0 or newer. Please note that Elements is a trimmed down version of Photoshop and this program does not support all of the necessary functions. The creation of design files can be a bit tricky, so it is recommended that this work be done by a graphic artist who is very familiar with Adobe Photoshop. If you require additional assistance with the design creation process, please
contact template support for rates and other options.
Designs Explained
Creating a design begins with the PSD
Your PSD has layers for artwork, photo regions and text regions, which this guide will cover. But that is just the visual portion of your design. Using the extra information a PSD can hold, called
metadata, you can tell the Upload tool the name of your design, any categories you want it to have and even the design collection you want it to show up in once processed.
What are templates and how are they created?
During processing, our Upload tool determines what products your design would work for based on its size. A template is your design applied to a product.
So if you have a design that could work for a print, totebag, photo panel and folded card then you will get four templates from the uploaded design.
And if you have multiple PSD's that have the same metadata, all the templates from those files will be part of the same design.
A template knows all about its parent design.
Designs, as mentioned above, have categories (as well as other important properties). Categories, and those other properties, are inherited by a design's templates.
So no matter what product you are viewing the EZP Builder if your design has a template for that product it will bring with it all of the categories and properties you've given to its parent design.
Organizing designs for use in the EZP Builder
To get your designs and their templates into the builder you need to create a design collection. A design collection is a group of designs in a particular order that is given a name. In the case of the design Snowflakes you see that the design collection is set as Christmas in its metadata.
When that design was processed, it was added to the end of the Christmas collection. After a design is added to a collection it can be sorted. Each design in a collection has a position that determines the order that its template will show in each product in the EZP Builder. In the case of Snowflakes, it will always appear before the templates for the #4 design and after the templates for the #1 & #2 designs.
The beauty of designs is that their sort order can be different from one collection to another. This makes it easy to offer multiple arrangements for different events or seasons throughout the year.
Creating your design
File Settings - Create a new file from the main menu (You may want to Save the Preset so that you can quickly create another template for the same product later.)
- Select Custom size and refer to the Document Size Guide below. Enter the appropriate width and height for the product you have chosen. (Most products will support both vertical and horizontal template layouts. If you wish to offer both orientations, you will need to create (2) separate template files, using "_V" or "_H" in the filename to differentiate the two.)
- Set the unites to pixels
- Set your resolution to 300 pixels/inch
- Color settings should be RGB 8 bit
- Use a white background
Design Guides
Artwork or text near the edges of the template may be cropped during production, so design guides have been specified to assist you in the design process; you will want to ensure that any critical elements such as text boxes and copyright marks fall within the guidelines noted. Refer to the notes in the
Document Size Guide to determine the correct guidelines for the product template you are designing.
- If the product you are designing requires a mask, as indicated in the Document Size Guide, you may download them here http://db.tt/RAMWCX. Place the appropriate mask in your design file. This should remain as your top layer, and you can turn it on and off as you are designing. Turn the mask layer on to see how your design will be cropped during the production process. Be sure to delete this layer or turn it off before you upload your design file; if you do not delete this layer, it may result in quality issues in production.
If no mask is provided, use guidelines to keep critical artwork away from the edges of the canvas. The Document Size Guide provides the minimum recommended clearance along all the edges for all critical elements.
Main Artwork
This layer will contain all fixed elements, such as logos, copyright marks, fixed text and other design elements. You can download the example templates shown in this guide here
http://db.tt/bfwSiZs.
- Artwork should be on a single layer; if you create the file on multiple layers, merge the artwork layers before uploading the design. If you do not merge the artwork layers, your design may not work as intended.
- Always view your final artwork at 100% opacity, as this is the way the design will be processed.
- If you use effects or blending options when creating your designs, merge this layer with your other artwork layers or a blank transparent layer. this is the only way that effects will be maintained in the final product.
- Each photo region must be solid RGB Blue (0,0,255)
- Each photo region must sit on its own layer, with no other data. If there is other (invisible) data on the photo layer, the photo region will be expanded when the design is imported, causing a design defect.
To ensure that there is no other data, create a new layer and lock the layer after you draw the photo region.
- Each layer should be named "Photo 1", "Photo 2", etc.
There are two types of photo regions- Basic photo region - simple square or rectangle photo region
- Special shape photo region - all other shapes
- To create a basic photo region, draw your shape on its own layer, on top of your artwork layer.
- To create a special shape, you will need to create a window in your artwork layer and place your photo on its own layer below the artwork.
- Using the marquee tool, select the area for your photo region. Delete the artwork within the marquee. do not use clipping paths or masks.
- Draw a rectangular photo region that is ~3 pixels wider than your window on each side. (Do not rotate your photo region).
- Move your photo region behind the artwork layer
- Ensure that your photo regions are drawn correctly and do not unintentionally overlap. If photo regions overlap the upper most photo may cover part of another photo, resulting in a design defect.
Text Regions
This section refers to all the text that the customer would customize (for example, an event date or photo caption). All text that the customer cannot customize should be included in the main artwork.
- Use paragraph type for text regions. Draw your text box large engough to accommodate the most extreme case and enter sample (example) text. (For example, if you are designing a greeting card and want the customer to be able to enter a poem, you could create a text box that covers most of the template area or if you are creating a text box for a person's name, make sure your box is large enough to accommodate long names
- Use the text tool to create the appropriate size box; do not use the transform function to stretch the text box boundaries, as this causes errors.
- To change the size of your text, use the text settings. Do not transform (CTRL + T (or CMD + T on Mac)) or stretch your text boxes. This will create scaling problems, and your template may not import properly.
- The sample text that you use in your psd file will be visible in the template previews; be sure to use appropriate sample text.
- Make sure that text boxes do not contain any extra carriage returns of text that runs beyond the lower boundary of the box, as this may cause errors.
- Designers may specify the following properties by typing sample text in the text box and formatting the sample (all text within a text box must have the same properties):
- Alignment (left/right/center)
- Font size
- Font Style (refer to enclosed list of fonts)
- Font color
- Please note that all text effects (including special spacing, rotation, all caps, etc.) will be lost during template import.
- By default, the instructional text which the customer sees will say "Click to add text." If you would like to offer different instructions, you can name your text layer like this:
- Format for the layer name is "i:instruction"
- If you would like the box to say "Personal Message" your layer name should be "i:Personal Message"
Creating Multi-Page Templates
Here is a breakdown of all currently implemented multi-page products:
2 Pages
- Star Ornament, 1012x975 (10137)
- Round Ornament, 1000x1000 (10138)
2/3 Pages
- 5 x 7 Folded Cards, 3054x2138, 2 groups (Outside, Inside) - (70200 and additional skus)
- Eco Friendly 5 x 7 Folded Cards, 3054x2138, 2 groups (Outside, Inside) - (74004)
- 3.5 x 5 Folded Cards, 2152x1538, 2 groups (Outside, Inside) - (70250 and additional skus)
- 5 x 7 Folded Card with Envelope, 3054x2138, 3 groups (Outside, Inside, last group empty for envelope) - (70250 and additional skus)
- 3.5 x 5 Folded Card with Envelope, 2152x1538, 3 groups (Outside, Inside, last group empty for envelope) - (70250 and additional skus)
- 5.25 x 5.25 Folded Cards with Envelope, 3226x1613, 3 groups (Outside, Inside, last group empty for envelope) - (70250 and additional skus)
In the above specs, portrait cards have dimensions width > height. Outside and inside are right-side-up to designer. Landscape cards have dimensions width < height. All of the inside page is right-side-up to designer.
The bottom half of the outside page is right-side-up to designer and will become the front of the folded
Adding Metadata to Your Files
As we mention in the Designs Explained section, metadata is what describes your PSD to the upload tool and allows the tool to add information and organization to the templates created from your uploaded design. We recommend using Adobe Bridge to assign the metadata as it provides quick and easy access to the available metadata fields and it allows you to add information to multiple PSD's at once. Below are the fields and what they represent to the design and templates created.
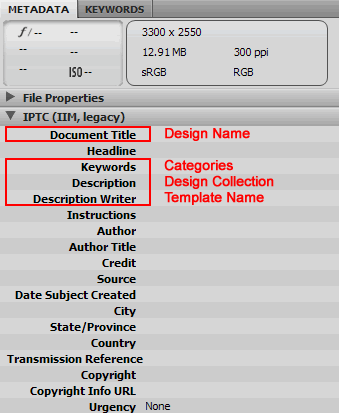
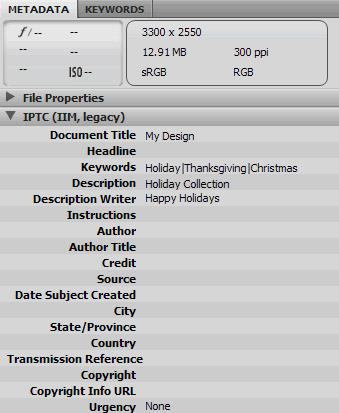
Looking at the metadata entered above you would end up with a Design called, 'My Design'. It would be uploaded directly into the Design Collection, 'Holiday Collection'. It has the following categories assigned to it, 'Holiday, Thanksgiving and Christmas'. These represent the most common fields that are used to prepare PSD's for upload. The last one is less common. This PSD will create a Template with the name, 'Happy Holidays'. The reason the Template Name field is less common is because by default it is not shown in the builder. This can be turned on in the create call for the builder deployment on your site, however.
When all the metadata needed has been assigned to your PSD's proceed to the Final Review.
Final Review and Uploading Your Files
Final Review - These are final steps and a quick checklist of common issues to look for before uploading your files.
- Trim your file, to eliminate any excess marks outside of the canvas area. Even one pixel outside of the canvas area can cause issues.
- Double check to ensure that your file is set to the correct pixel dimensions, as indicated in the Document Size Guide.
- Make sure all artwork is merged into a single layer.
- If your PSD has a 'EZP-MASK' layer it should be removed. (This will not be necessary after the next release of ezp Tools)
Lastly, view the Design Center User Guide for instructions on uploading your design and reviewing its templates.
Document Size Guide
* Templates for this product can be both vertical and horizontal. To create a template with both landscape and portrait orientations, two psds must be created - one for each orientation. These two psds will be named exactly the same except the landscape psd will start with "h_" and the portrait psd will start with "v_". The psds can be uploaded in any order. For each product that matches the psd size, three templates will be created, one landscape only, one portrait only, and one combined landscape and portrait. If there are no issues, the desired templates can then be approved and published.
** The
Sample Template links provide ready-to-use PSD's for template creation. However, as of right now the 'EZP-MASK' layer will need to be removed prior to uploading. This will not be necessary after the next release of ezp Tools.
Photobooks
| Product | Width | Height | Guides | Template |
|---|
| 8x8 Photo Book | 2475 | 2475 | working space = 7.125" W x 7.25" H | Coming soon |
| 8.75x11 Photo Book | 3426 | 2649 | working space = 10.125" W x 7.875" H | Coming soon |
| 12x12 Photo Book | 3675 | 3675 | working space = 11.125" W x 11.25" H | Coming soon |
Gifts & Keepsakes
Apparel
| Product | Width | Height | Guides | Template |
|---|
| Apron* | 2850 | 2250 | Set guides 1/8" in from edges | Sample Template |
| T Shirt, Youth S - XL | 2850 | 2250 | Set guides 1/8" in from edges | Sample Template |
| T Shirt, Adult S - XXL | 2850 | 2250 | Set guides 1/8" in from edges | Sample Template |
| T Shirt, Adult S - XXXL 13x10 Image | 3900 | 3000 | Set guides 1/8" in from edges | Sample Template |
Photographic Prints
Cards & Stationery
| Product | Width | Height | Guides | Template |
|---|
| 1.75” x 1.75” Sticker – 24 Pack* | 525 | 525 | | Sample Template |
| 1.6" x 2.25" Sticker - 20 Pack* | 675 | 480 | | Sample Template |
| 1" x 2.625" Address Label - 30 Pack* | 825 | 338 | Set guides 1/8" in from edges | Sample Template |
| Eco Friendly Small Notepad | 1200 | 1200 | Set guides 1/8" in from edges | Sample Template |
| 3.5x5 Folded Cards* | 1538 | 1076 | Set guides 1/8" in from edges | Sample Template |
| 3.5x5 Folded Cards with Envelope* | 2152 | 1538 | Set guides 1/8" in from edges | Sample Template |
| Eco Friendly 4x5 Note Cards* | 1500 | 1200 | Set guides 1/8" in from edges | Sample Template |
| Eco Friendly Notepad | 1500 | 1500 | Set guides 1/8" in from edges | Sample Template |
| 4x6 Postcard* | 1800 | 1200 | Set guides 1/8" in from edges | Sample Template |
| 5x7 Folded Card* | 2138 | 1527 | Set guides 1/8" in from edges | Sample Template |
| 5x7 Folded Card with Envelope* | 3054 | 2138 | Set guides 1/8" in from edges | Sample Template |
| 5x7 Greeting Card* | 2100 | 1500 | Set guides 1/8" in from edges | Sample Template |
| 5.25x5.25 Folded Card with Envelope | 3226 | 1613 | Set guides 1/8" in from edges | Sample Template |
| Eco Friendly 5x7 Folded Cards* | 2138 | 1527 | Set guides 1/8" in from edges | Sample Template |
| Eco Friendly Refrigerator Notepad | 2438 | 1088 | Set guides 1/8" in from edges | Sample Template |
| 4x8 Greeting Cards* | 2400 | 1200 | Set guides 1/8" in from edges | Sample Template |
| 12 - 18 Month Calendars | 3300 | 2550 | Set guides 1/8" in from edges | Sample Template |
4x9.25 Flat Cards*
Matte, Pearl and Felt paper options | 2812 | 1237 | Set guides 1/8" in from edges | Sample Template |
5x7 Flat Cards*
Matte, Pearl and Felt paper options | 2137 | 1537 | Set guides 1/8" in from edges | Sample Template |
3.5x5 Flat Cards*
Matte, Pearl and Felt paper options | 1537 | 1087 | Set guides 1/8" in from edges | Sample Template |
5.25x5.25 Flat Cards*
Matte, Pearl and Felt paper options | 1612 | 1612 | Set guides 1/8" in from edges | Sample Template |
Rolled Canvas
Gallery Wrapped Canvas
| Product | Width | Height | Guides | Template |
|---|
| 8x10 Gallery Wrapped Canvas | 4050 | 3450 | Set guides 1.75" in from edges | |
| 8x12 Gallery Wrapped Canvas | 4650 | 3450 | Set guides 1.75" in from edges | |
| 10x10 Gallery Wrapped Canvas | 4050 | 4050 | Set guides 1.75" in from edges | |
| 10x15 Gallery Wrapped Canvas | 5550 | 4050 | Set guides 1.75" in from edges | |
| 11x14 Gallery Wrapped Canvas | 5250 | 4350 | Set guides 1.75" in from edges | |
| 12x12 Gallery Wrapped Canvas | 4650 | 4650 | Set guides 1.75" in from edges | |
| 12x18 Gallery Wrapped Canvas | 6450 | 4650 | Set guides 1.75" in from edges | |
| 16x20 Gallery Wrapped Canvas | 7050 | 5850 | Set guides 1.75" in from edges | |
| 16x24 Gallery Wrapped Canvas | 8250 | 5850 | Set guides 1.75" in from edges | |
| 20x20 Gallery Wrapped Canvas | 7050 | 7050 | Set guides 1.75" in from edges | |
| 20x30 Gallery Wrapped Canvas | 10050 | 7050 | Set guides 1.75" in from edges | |
| 24x24 Gallery Wrapped Canvas | 8250 | 8250 | Set guides 1.75" in from edges | |
| 24x36 Gallery Wrapped Canvas | 11850 | 8250 | Set guides 1.75" in from edges | |
| 30x40 Gallery Wrapped Canvas | 13050 | 10050 | Set guides 1.75" in from edges | |
| 36x36 Gallery Wrapped Canvas | 11850 | 11850 | Set guides 1.75" in from edges | |
Framed Canvas
| Product | Width | Height | Guides | Template |
|---|
| 10x25 Framed Canvas | 7500 | 3000 | Set guides 1/2" in from edges | |
| 11x14 Framed Canvas | 4200 | 3300 | Set guides 1/2" in from edges | |
| 12x18 Framed Canvas | 5400 | 3600 | Set guides 1/2" in from edges | |
| 16x16 Framed Canvas | 4800 | 4800 | Set guides 1/2" in from edges | |
| 16x20 Framed Canvas | 6000 | 4800 | Set guides 1/2" in from edges | |
| 16x40 Framed Canvas | 12000 | 4800 | Set guides 1/2" in from edges | |
| 20x30 Framed Canvas | 9000 | 6000 | Set guides 1/2" in from edges | |
| 22x55 Framed Canvas | 16500 | 6600 | Set guides 1/2" in from edges | |
| 24x24 Framed Canvas | 7200 | 7200 | Set guides 1/2" in from edges | |
| 24x36 Framed Canvas | 10800 | 7200 | Set guides 1/2" in from edges | |
| 24x60 Framed Canvas | 18000 | 7200 | Set guides 1/2" in from edges | |
| 30x30 Framed Canvas | 9000 | 9000 | Set guides 1/2" in from edges | |
| 30x40 Framed Canvas | 12000 | 9000 | Set guides 1/2" in from edges | |
| 30x45 Framed Canvas | 13500 | 9000 | Set guides 1/2" in from edges | |
| 36x36 Framed Canvas | 10800 | 10800 | Set guides 1/2" in from edges | |
Rolled Poster
| Product | Width | Height | Guides | Template |
|---|
| 10x25 Rolled Poster | 7500 | 3000 | | |
| 11x14 Rolled Poster | 4200 | 3300 | | |
| 12x18 Rolled Poster | 5400 | 3600 | | |
| 16x16 Rolled Poster | 4800 | 4800 | | |
| 16x20 Rolled Poster | 6000 | 4800 | | |
| 16x40 Rolled Poster | 12000 | 4800 | | |
| 20x30 Rolled Poster | 9000 | 6000 | | |
| 22x55 Rolled Poster | 16500 | 6600 | | |
| 24x24 Rolled Poster | 7200 | 7200 | | |
| 24x36 Rolled Poster | 10800 | 7200 | | |
| 24x60 Rolled Poster | 18000 | 7200 | | |
| 30x30 Rolled Poster | 9000 | 9000 | | |
| 30x40 Rolled Poster | 12000 | 9000 | | |
| 30x45 Rolled Poster | 13500 | 9000 | | |
| 36x36 Rolled Poster | 10800 | 10800 | | |
Framed Poster
| Product | Width | Height | Guides | Template |
|---|
| 10x25 Framed Poster | 7688 | 3075 | Set guides 1/2" in from edges | |
| 11x14 Framed Poster | 4295 | 3375 | Set guides 1/2" in from edges | |
| 12x18 Framed Poster | 5513 | 3675 | Set guides 1/2" in from edges | |
| 16x16 Framed Poster | 4875 | 4875 | Set guides 1/2" in from edges | |
| 16x20 Framed Poster | 6094 | 4875 | Set guides 1/2" in from edges | |
| 16x40 Framed Poster | 12188 | 4875 | Set guides 1/2" in from edges | |
| 20x30 Framed Poster | 9113 | 6075 | Set guides 1/2" in from edges | |
| 22x55 Framed Poster | 16688 | 6675 | Set guides 1/2" in from edges | |
| 24x24 Framed Poster | 7275 | 7275 | Set guides 1/2" in from edges | |
| 24x36 Framed Poster | 10913 | 7275 | Set guides 1/2" in from edges | |
| 24x60 Framed Poster | 18188 | 7275 | Set guides 1/2" in from edges | |
| 30x30 Framed Poster | 9075 | 9075 | Set guides 1/2" in from edges | |
| 30x40 Framed Poster | 12100 | 9075 | Set guides 1/2" in from edges | |
| 30x45 Framed Poster | 13613 | 9075 | Set guides 1/2" in from edges | |
| 36x36 Framed Poster | 10875 | 10875 | Set guides 1/2" in from edges | |
Builder Supported Fonts
Download all ezp Builder Fonts- Liberation Sans Regular, Bold, Italic, and Bold Italic
- Liberation Serif Regular, Bold, Italic, and Bold Italic
- Questrial
- Short Stack
- Saturday Morning (aka Mountains of Christmas)
- Chantelli Antiqua
- Roman SD
- All Star
- Budmo Jiggler
- Bebas Neue
- Bangers
- Gothic Bold
- Bowlby One
- Playoff
- ChunkFive Roman
- Paytone One
- Brock Script
- England Hand
- Calamity Jane Bold
- Dancing Script
- Redressed
- Pacifico