Design Center User Guide
Creating Collections
If this is your first time to the Design Center you will not see any design collections under your brand name. You will, however, see all of the ezprints design collections. These are here so you can see the various design and product offerings in the ezprints Design library and possible arrangements of those designs.
To get started managing your own design collections, click on Add Collection at the top right of the page. You will see a dialog box like the one shown below.
From this dialog box you will be able to name a new design collection. And you will be given three options:
- Use existing designs – This option will take you to the Edit Collection page. From there you will be able to choose from any design from your own library of designs or from the vast ezprints Design Library.
- Upload new designs – This option will take you to the Upload page where you can choose files from your computer to upload. These will be added to your designs library and you will have full control over what templates ultimately make up the contents of a design.
- Duplicate an existing design collection – This option will allow you to duplicate a design collection you have already created. This is helpful if you have a collection that can act as a base for all your later collections. For instance, if you always want a particular offering of ezprints designs, you could create a collection of just those designs. Then you could duplicate it whenever you want to make a new collection that has the same ezprints designs but also includes your own designs.
Once you have decided the type of design collection you are going to create, click Create Collection to move onto the next step.
Managing Collections
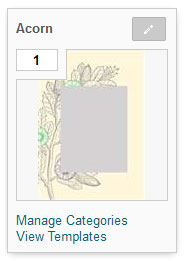
Each design collection you have is represented on the Manage Collections page by a tray that very closely resembles the template tray in the ezp Builder. Each of these trays will have a handful of options:
- Sort Collection – This option will take you to the Sort Collection page where you will be able to customize many aspects of the designs in your collection. From the order of the designs, to the names of designs, to the categories that each design has.
- Edit Collection – This option will take you to the Edit Collection page where you will be able to customize what designs make up your design collection. You will be able to choose designs from your design library as well as any design in the EZ Prints Design Library.
- Collection Products – This option will take you to the Collection Products page. This page allows you to see every product that your design collection has templates for simultaneously. Throughout the rest of the Design Center you will be interacting with a design collection from the context of a single product (You choose to see 5x7 Folded Cards and the tray displays 5x7 Folded Cards. However, if you are adding and removing designs you only see how those additions and removals affect the currently chosen product. This page allows you to see the affects of those actions across all products. So you can add and remove designs and then go to this page and see how each product will look to the user visiting the builder on your website.
- Preview in Builder – This option will load your design collection in the ezp Builder so you can see what the end user would experience.
- Delete Collection – This option will allow you to delete a design collection. You will be asked to confirm the deletion so as to avoid unintentional deletions of design collections.
 |
In addition to those options, you will also be able to navigate the tray similar to when using the ezp Builder. You can use the left and right arrows to see more templates. You can filter the templates you see for a product by using the ‘View More Style Categories’ button above the tray. And you can view other products by searching in the input field above the Add Collection link at the top of the page. This will load that product for all of the collections on the page.
Adding Designs from ezprints A to Z Collection
Often you would like to include some of the designs from the ezprints A to Z collection to your own custom collection. This can be accomplished on the
Edit Collections page.
- You need to create a collection and give it a name or you can begin with an existing collection in your brand.
- Click Add collection (If you already have a collection then skip this step and go to the Edit Collections section to see how to add/remove designs from a collection)
- Give your new collection a name
- Choose the Use existing designs option
- Click Create Collection
- This will take you to the Edit Collections page. This page is where you can add and remove designs from a collection. This process is explained in detail in the Editing Collections section below.
Sorting Collections
To sort a design collection you will need to find the desired collection on the Manage Collections page and click the Sort Collection link above the tray for the collection. Once on the Sort Collection page you will see two sections at the bottom:
- A column on the left with a list of categories that exist for the design collection that you are sorting
- A column on the right with the design tiles for the collection
There are now three ways to sort the order of the designs in a collection, as shown below:
- Drag & drop designs to rearrange them manually for the current page of designs you are viewing. (This method is often easy for a few quick changes on a single page of designs.)
- Enter the numeric position you want to move a design to, regardless of whether that position is on the page you are currently viewing. (This method is ideal when making either a few or many sort order changes across multiple pages.)
- Select a category, which will select all designs that have that category, and click either to ‘Move All To Front Of Collection’ or ‘Move All To Back Of Collection’ to move all the designs at once to the front or back. (This method is ideal for moving many designs at once across multiple pages. This is invaluable for moving seasonal designs after their target season has passed. For instance, moving all Valentine’s Day designs to the back of the collection after Valentine’s Day has passed.)
The order of designs within a collection will dictate the order of templates that appear in the template tray in the ezp Builder. Remember that a design represents one or more templates that, in most cases, have the same artwork and often the same overall aesthetic applied to one or more products. So if you sort a design to the front of your design collection, the templates within that design will always appear first in the template tray in the ezp Builder for any product that they exist for.
After each change to the order of designs, the tray at the top of the page will refresh to reflect the change. (Note that this refresh may not appear different unless the change in order affected designs that have templates for the current product you are viewing. If you want to see how your change affected other products, you can change the product via the input field above the tray or by visiting the Collection Products page.)
The Sort Collections page also offers options for changing aspects of a design.
 |
- Edit a design’s name – This option allows you to make changes to the name of the design. When saving the new name, as a safety measure, the tool will check to see if there is another design in your library already has that name and if so you will be prompted to merge the designs or cancel. If you cancel you can edit the name again using a different name. If you choose to merge the two designs, all of the templates that belong to the design you are renaming will be added to the design to which you are merging. In this process the tool will also look to see if there are any categories that existed for the design you are renaming that don’t exist on the design to which you are merging. If any are found you will be given the option to add them to the merged design. After the merge, the design you renamed will disappear and only the one you merged with will remain. (Note that the design you merged into may not be on the current page.)
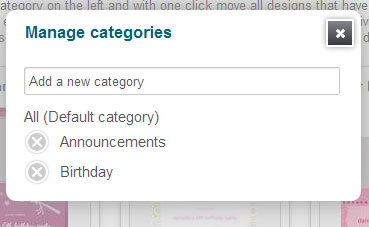
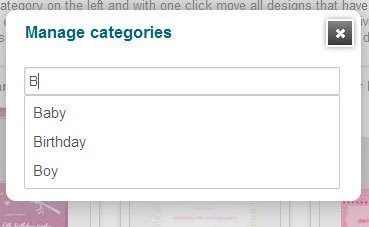
- Manage categories – This option allows you to add and remove the categories that your design has. Remember that the categories a design has are inherited by the templates in that design. So if your design had the category ‘Birthday’ and it had a template for a 5x7 Folded Card, then when viewing that product in the builder, the categories popup would have ‘Birthday’ as an option to filter the templates in the tray to only show those that have the ‘Birthday’ category. When entering a new category, as you type you will see already existing categories that partially match what you are typing. At any time you can hit Enter to add the category just as you have typed it or you can choose from the list below
- View templates – This option is similar to the Review page that you visit after uploading your own designs. (See the section on Reviewing Uploaded Designs to see what actions can be taken on templates.) You will get a popup that lists all of the templates for the design you clicked on. You will be able to filter the templates by their status or whether they have errors. The options are:
- All - This will just show all templates for the design regardless of the their status.
- Pending – This status means the template was created but has not yet been approved by a design manager or a higher level administrator for your brand. (Note that if a template has errors it will not be able to change its status from ‘Pending’.)
- Approved – This status means that the template was approved, meaning it didn’t have any errors and it looks good in the ezp Builder. But this template will not be visible to the public until its status becomes ‘Published’.
- Published – This status means that the template has been fully inspected and is now published and available for the public. (Note that just because the template has a status of ‘Published’ it will not show up on your website until its parent design is added to the design collection that you are referencing in the ezp Builder deployment on your website.)
- Archived – This status means that the template was once ‘Published’, so it is error free and has been published but for some reason it was decided to not make it visible to the public after it was made ‘Published’.
- Errors – This view option will only show you templates that have errors. This is helpful to quickly identify and address problem templates.
You will also be able to view templates by product, regardless of their status or if they have errors, by using the input in the ‘View specific product’ section at the top of the popup. You can also order the templates in any view by Date or Name in ascending and descending order.
Editing Collections
To edit a design collection you will need to find the desired collection on the Manage Collections page and click the
Edit Collection link above the tray for the collection. The purpose of the Edit Collection page is to make it easy to find designs, from either your design library or the EZ Prints Design Library, and then add or remove them from your design collection. This is accomplished via the omni-search input field in the middle of the page.
Omni-search
This search box aggregates all of the Design Collections, Designs and Categories from the chosen design library (Either ‘My Designs’ or ‘EZ Prints Designs’) as well as all possible products. You can search for anything that falls into one of the listed types above and when one is selected all the designs that match that omni-search choice will be loaded. You can then add another choice by which to filter the designs that are displayed.
For instance, you could search ‘5x7 Folded Cards’ and then you could filter those further by choosing a category from the omni-search input.
To make choosing designs to add more useful, if you change the product for the tray at the top of the page it will also change the product choice in the omni-search input to match. This way you will always be looking at the designs that have templates for the product you are viewing. Of course, you can remove the product choice after it is set in order to view a different subset of designs.
If it turns out that the combination of the choices you made did not find any designs within your chosen library, you will be notified and then you can click the choice to remove it. Once removed, the page will load designs based on the remaining choices.
If all of the choices are removed it will return all designs for the chosen library.Adding / Removing Designs
On each design tile there will be a button that says either ‘Add’ or ‘Remove’ based on whether the design is in your design collection or not. To make finding the designs that are already included in your collection or those that aren't, we have added options for filtering the designs. Your options are
In Collection and
Not In Collection.
To find the designs you wish to add just use a combination of search choices when in the
ezprints Designs library. When you see the designs results from your search you can easily see what is in and not in your collection by using the filter buttons seen above. Once you click
Add or
remove your collection will immediately update.
This means that when adding or removing a design from your design collection the tray at the top of the page will refresh to reflect the change. (Note that just like on the Sort Collection page, you may not see a change in the tray after the refresh if the designs you added or removed didn't have a template for the product that is currently chosen for the tray.)
Collection Products
To view all of the products at once for a design collection, you will find the desired design collection on the Manage Collections page and then choose ‘Collection Products’. Once on the Collection Products page you will see product categories listed at the top that represent all the products that your design collection has based on the designs in your collection and their templates. When you choose any category you will see a tray for each product in that category for your design collection. This page is purely informational in that you cannot change anything about the designs or templates, you can only see them and preview them in the ezp Builder.
Uploading Designs
You can reach the Upload page by clicking ‘Upload’ under ‘Design Center’ in the top navigation of the Tools website. On this page there are three sections.
- The upload queue – This is the top framed section where you have two buttons: Add files & Start upload. This is where you will add PSD’s to the upload queue and when ready trigger them to be uploaded and processed.
- The uploaded PSD list – This is the bottom framed section where all your uploaded PSD’s will be displayed. Each entry has helpful information about the uploaded PSD including:
- Filename – The filename of the uploaded PSD.
- Designer – The username of the person who uploaded the PSD.
- Status – This lets you know if the PSD has been processed. There are four possible values:
- Uploaded – This is the first step in the process. This just means that the PSD file was uploaded.
- Processing – This means that the PSD is currently being processed and all appropriate templates are being created for it and if there is any metadata attached to the PSD (Such as design name, design collection name, template name or categories) that data is also being processed as necessary.
- Complete – This means that the PSD has been fully processed and all templates for it have been created along with any actions that needed to take place based on any metadata that the PSD had.
- Error – This means that something happened after uploading the PSD. The upload tool knows to try processing this PSD again if it has this error. Often times this is resolved on the second attempt to process.
- Last Activity – This is the date and time for when a PSD was uploaded. This can change if for instance you upload a PSD again after finding that it had errors.
- The Attention disclaimer – This is the top right framed section of the Upload page. It is where you will find any information about products that aren’t fully supported through the upload tool. This section should be reviewed before uploading to make sure that you are aware of any changes to the products supported by the upload tool.
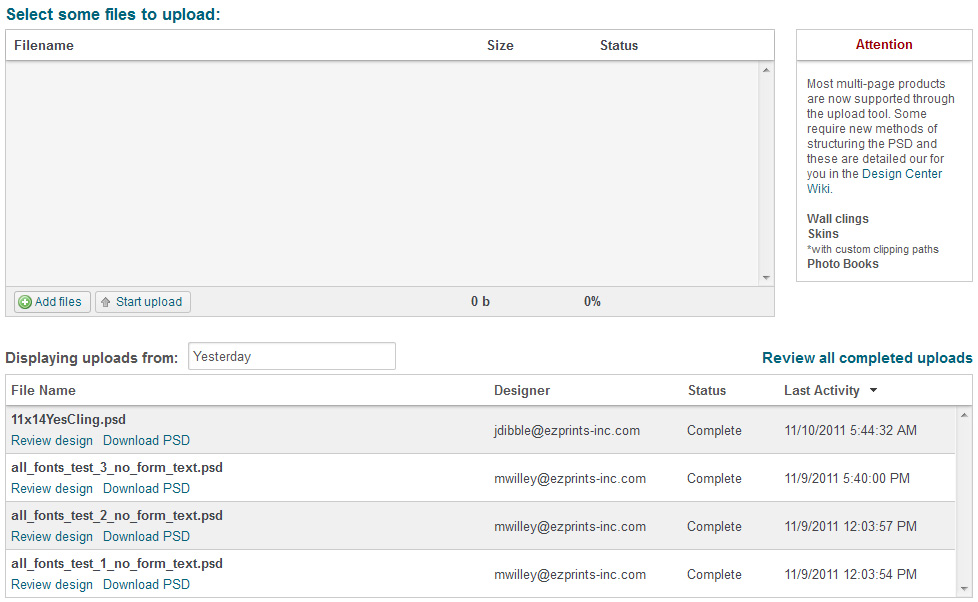 |
You can upload many PSD’s at once and when you see the status of ‘Complete’ for a PSD you will be able to go to the ‘Review’ page to view the templates that were created.
You can now specify the date range for which uploaded PSD's will be displayed.
You can also sort any of the columns of the uploads list in ascending or descending order to make finding your uploads easier.
Reviewing Uploaded Designs
After uploading designs through the Upload tool the next step is to review the templates that were created from each PSD. You can reach the Review page from either the top navigation link under Design Center or from the Upload page itself. On the Upload page you can either click the ‘Review all completed uploads’ link or under each PSD that has been processed, there will be a ‘Review design’ link. This will take you to the Review page and load the templates for that particular PSD.
The Review page has three main sections:
- Choose time range – This is where you pick the range of time for which you want to see uploaded PSD’s. Possible choices are:
- Today – The past 24 hours.
- Yesterday – The past 48 hours.
- Last week – The past 7 days.
- Last month – The last 30 days.
- All time – All uploads for your brand
- Recent upload list – This is the list of PSD’s that will appear at the bottom right of the page after choosing a time range. (Note if you do not see any PSD’s listed after choosing a time range try choose a longer range of time.) You can click on any of the listed PSD’s and their templates will be loaded on the right side of the page. There are a couple of helpful features for navigating the Recent upload list and they are:
- Sort By – This allows you to sort the uploaded PSD’s by their Last Activity date, which you see on the Upload page, or by their name in either ascending or descending value.
- Filter psd's by their template's status - This is similar to the content filters mentioned later in this guide, however they only affect the recent upload list. Each status filter (Pending, Approved, Published and Archived) is a toggle that can be turned on or off. You can choose none as well as one or more. If for instance you choose Pending and Approved you would only see PSD's that have at least one template with either a status of Pending or Approved. This will make it easy to find the templates that still need to be published.
- Find a specific psd – This input field allows you to type the name of a PSD and it will show you a real-time list of PSD’s limited by the text you have entered. You can hit enter at any time to limit the recent upload list to show only the PSD's that partially matched to what you have typed. Or you can click the PSD name that you want from the list to go directly to a specific PSD and load its templates. To return the recent upload list to what it had before the partial match you typed, just remove the partial search and hit Enter or click away from the input field.
- Template result list – This is the right side of the page where the templates will be loaded for the selected PSD.
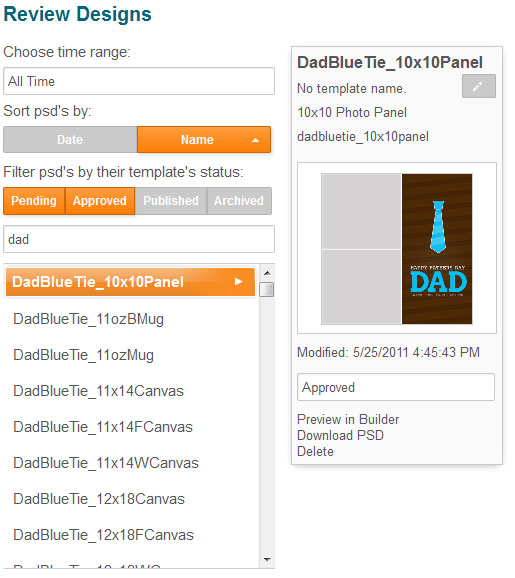 |
Template tiles have lots of information about each template including:
- Design name – This is the name of the design to which the template belongs. (Note that if a PSD is uploaded and it does not contain a metadata entry for a design name that the name of the PSD will become the design name for each template. You can change the design name of a template on the Sort or Edit collection pages by clicking the edit name button at the top of the design tile.)
- Template name – Templates can have names of their own. These are used to better distinguish multiple templates for a single design for a single product. For example, if you had three 5x7 Flat Cards for a wedding design and they represented the RSVP, Save the Date, and Invitation for a wedding then you could make those the names for the three templates. This is not necessary and will not affect the templates ability to be used in the ezp Builder.
- Product name – This is the name of the product that the template is for.
- Template ID – This is the name of the PSD that created the template. The ‘Template ID’ is what would be referenced when wanting the builder to load with a particular template selected.
- View template proof – You can view an image of each template similar to how it will look in the builder by moving your mouse over the thumbnail for the template and then clicking the magnifying glass that appears. You will then get a popup of the template proof. This is helpful for a quick glance of what the template looks like in the builder without loading the ezp Builder. (Note that this is not recommended as the method for approving a template. You should always view each template you want to publish in the ezp Builder to make sure the user experience is what you want.)
- Modified – This is the date for the last change made to the template.
- Status – This input field displays the current status of the template. The possible statuses are:
- Pending – This status means the template was created but has not yet been approved by a design manager or a higher level administrator for your brand. (Note that if a template has errors it will not be able to change its status from ‘Pending’.)
- Approved – This status means that the template was approved, meaning it didn’t have any errors and it looks good in the ezp Builder. But this template will not be visible to the public until its status becomes ‘Published’.
- Published – This status means that the template has been fully inspected and is now published and available for the public. (Note that just because the template has a status of ‘Published’ it will not show up on your website until its parent design is added to the design collection that you are referencing in the ezp Builder deployment on your website.)
- Archived – This status means that the template was once ‘Published’, so it is error free and has been published but for some reason it was decided to not make it visible to the public after it was made ‘Published’.
- Preview in Builder - This option will load your template in the ezp Builder so you can see what the end user would experience.
- Download PSD – This option allows you to download the PSD for the template so you can fix any errors that may have been found during the creation of its templates.
- Delete – This option will allow you to completely delete a template so you can remove undesired templates or start fresh when re-uploading a PSD. (Note that you cannot delete a template once it has been made ‘Published’. This is to protect users who may have created a project in the ezp Builder using that template that they haven’t ordered yet. If you would like to prevent a template from being seen by users, just set its status to ‘Archived’ as mentioned above.
Filtering Content
To make managing of your design collections, designs and templates easier and more efficient we have given you options for filtering the content of each page of Design Center.
With these filters you will be able to quickly identify templates and designs that require further work. This is important because a template must be set to
Published before it will appear in the ezp Builder outside of Design Center.
When changing the filters you will need to click the Update Filter button to reload the content of the page using your newly chosen filters. *Note that the Update Filter button will remain disabled unless your chosen filters are different then what was selected when the page loaded and there must be at least one filter chosen.